GitHub Actions Build with Runner and Deploy using self-hosted

Use GitHub Actions to build and deploy with a private runner to deploy to IIS

Project: ASPX Website on GitHub.

Goal: Complete CI / CD using GitHub Actions to build and using self-hosted running to deploy to on-prem IIS server.

Final Workflow file YML


name: Build and Publish

on:
  workflow_dispatch:
  push:
    branches:
      - main

jobs:
  build:
    name: Build
    runs-on: windows-latest
    steps:
        - uses: actions/checkout@v3

        - name: Setup MSBuild path
          uses: microsoft/setup-msbuild@v1.1

        - name: Setup NuGet
          uses: NuGet/setup-nuget@v1.0.5

        - name: Create Build Directory
          run: mkdir ${{github.workspace}}\_build\

        # - name: Show build files (before)
        #   run: ls ${{github.workspace}}\_build\

        - name: Restore NuGet packages
          run: nuget restore -verbosity quiet

        - name: Build app for release
          run: msbuild Website\Website.csproj -verbosity:minimal -t:rebuild -property:Configuration=Release /p:WebPublishMethod=FileSystem /p:DeployOnBuild=true /p:DeployDefaultTarget=WebPublish /p:PublishUrl="../_build"

        # - name: Show build files (after)
        #   run: ls ${{github.workspace}}\_build\

        - uses: actions/upload-artifact@v3
          with:
            name: my-artifact
            path: ${{github.workspace}}\_build\

  deploy:
    needs: Build
    name: Copy WebPublish files to remote server
    runs-on: self-hosted
    steps:

      - name: Run PowerShell Remove-Item 
        run: Remove-Item ${{github.workspace}}\_build\ -Force -Recurse

      - uses: actions/download-artifact@master
        with:
          name: my-artifact
          path: ${{github.workspace}}\_build\

      # - name: Show build files (before)
      #   run: ls ${{github.workspace}}\_build\

      # - name: Run PowerShell Hello World script
      #   run: Write-Output 'Hello World!'

      - name: Run PowerShell Copy-Item
        run: |
            $psversiontable;
            Copy-Item -Path ${{github.workspace}}\_build\* c:/websites/dev.${{github.event.repository.name}} -Recurse -Force

What to do when you receive an ADA Compliance letter?

Over the last few years, many businesses have received letters from attorneys advising them that their website is not ADA compliant. 

If you receive one of these letters, make sure that those reaching out to you include a REPORT showing: 

  • Which tool they used to audit your website on?
  • What score your website received as well as recommendations on what to fix in order to get your site a higher score?
    (Without a report, there is no way to know what they found and what they are requiring to make your website compliant.)

There are three levels for WCAG 2.1 Guidelines and each one meets the needs of different groups and different situations:

A – lowest with 25 criteria your website must reach
AA – mid range – in addition to the level A criteria, your website needs to meet 13 more criteria
AAA – highest – all of A and AA plus an additional 23 criteria that your site needs to meet

The standard recommended level of compliance, and the level most often legally required for websites, is AA. The AAA level is required for government and banking institutions. As web developers, we aim to get our clients to 90+ at the AA level using Google’s Lighthouse Tool which covers many WCAG 2.1 Level AA requirements.
https://www.boia.org/blog/googles-lighthouse-accessibility-tests-are-helpful-but-not-perfect ]

Asking to have your website 100% ADA compliant is not reasonable and is almost impossible to ensure because:

1. There are many tools out there to run website audits on, and each one ranks websites differently depending on the parameters their tool is set at because it’s not a “pass-fail” test.

2. Which browser are they running the audit on ( Chrome, Firefox, Safari, etc.) effects the score 

3. There are endless variations in the type and severity of disabilities.
https://myaccessible.website/blog/wcaglevels/wcag-levels-a-aa-aaa-difference ]

The WCAG Guidelines are centered around these 4 main principles:

Principle 1 – Perceivable: Information and user interface components must be presentable to users in ways they can perceive
Using one or more of their senses, users need to be able to perceive and understand your website in some significant way.

Principle 2 – Operable : User interface components and navigation must be operable
Users need to have the ability to navigate through your website and UI elements like the ability to click a button either with a mouse, voice command, or other method

Principle 3 – Understandable: Information and the operation of the user interface must be understandable
Your website content should be readable, understandable and digestible to readers.

Principle 4 – Robust : Content must be robust enough that it can be interpreted reliably by a wide variety of user agents, including assistive technologies
Your website’s content needs to be developed keeping in mind how it will work across different types of browsers, both presently and in looking ahead to the future.

https://www.cuinsight.com/make-credit-union-website-ada-compliant/ ]

If you receive a letter and/or report, please contact us at support@dhali.com. We will gladly run an audit on your site and make any necessary changes needed to meet the threshold needed for you website.

TLS 1.2 with Classic ASP

Looking at Twillio docs Using Twilio with Classic ASP and VBScript we implanted Twillio SMS API

We encountered the following error message:


Invalid TLS version
Upgrade Requiredhttps://www.twilio.com/docs/errors/20011426

The TLS versions on the server appreared to be causing the error TLS 1.0, TLS 1.1 and TLS 2.0

We used https://www.ssllabs.com/ssltest to get the current TLS Configuration.

The results showed TLS 1.0 and TLS 1.1 where enabled. This was causing the issue as we need TLS 1.0 and TLS 1.1 to be removed.

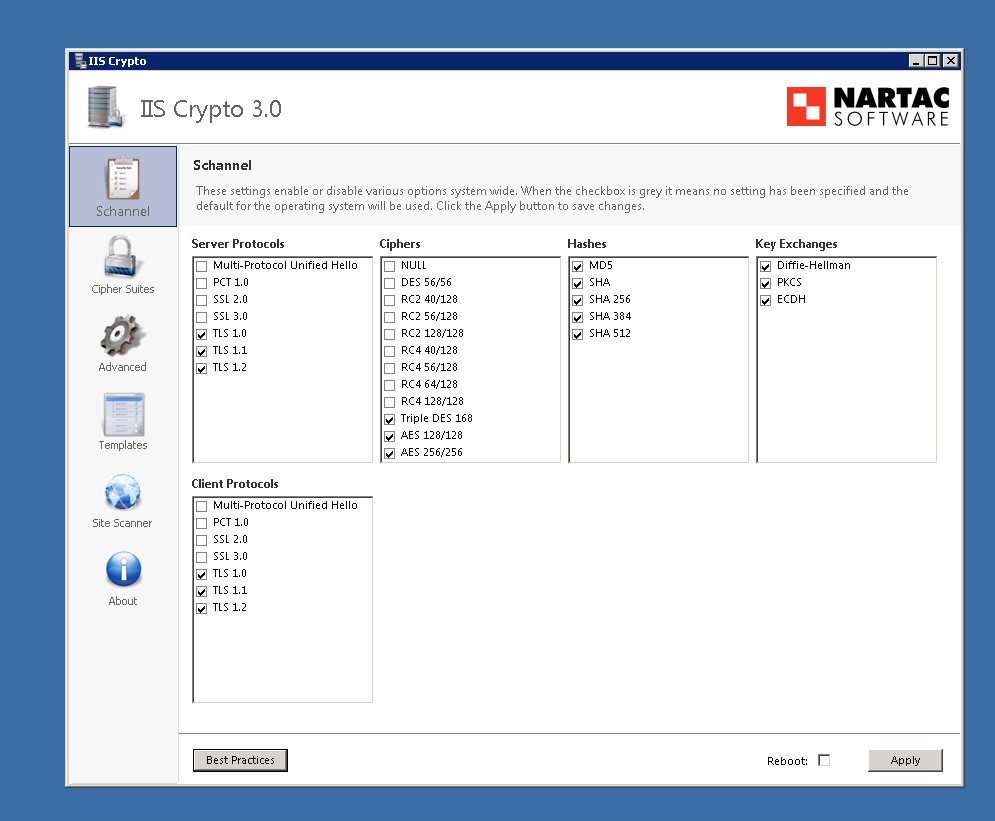
Using IISCrypto Tool we updated the Registry Files to update the TLS settings


We ran another test using https://www.ssllabs.com/ssltest and the results showed TLS 1.0 and TLS1.1 where no longer available.


After we applied these changes and re-booted the server, the Twillio SMS messages where sent successfully.


However, the SQL Connection String began to break and the Classic ASP website where down.

The SSL Connection was using “SQL Connection” ODBC driver.

We need to update to the latest ODBC to the lastest version which supports TLS 1.2  [Microsoft® ODBC Driver 13.1 for SQL Server]


Then we need to update the connection string to use the current ODBC SQL 13 driver


Now everything is working!

Advance Custom Field PRO Repeaters

Advance custom fields is a very powerful plugin for WordPress. In this blog post I will be teaching you how to use the Repeater field from Advance Custom Fields PRO. There are will be two steps that are required to get the Repeater working.

WordPress Admin

Log into the your site back in and make sure you have administrator privileges. If you do not have Advance Custom Fields PRO installed and the license activated please take time to do this.

Steps for creating the Repeater Field:

  • On the left hand side of your Dashboard there should be “Custom Fields”
  • This is where all the Field Groups are that you have created for your site. Press “Add New” on the top of the page
  • The first entry field is the title of the ACF. This will only be seen on the back end when a user is trying to add data. This can be whatever you want. For this demo I will be calling mine “Repeater Test”.
  • Next what you want to do is press the blue button that says “+ Add Field”. This is where we are going to create our repeater field.
    • Field Label: This is the title of the repeating element. For example: If you want a page to have multiple Icons, the Field Label will be “Icons”, If you want different display blocks the Field Label will be “Blocks”, etc.
    • Field Name: This is automatically generated when you add the first Field Label. This will be used when we are writing the Code. Make sure there are no spaces in this field. The best practice is to add a Field Label and use the auto generated name.
    • Field Type: For this example we are using Repeater. Note: If you do not have the PRO version there will be no Repeater for you to select.
    • Instructions: Displays to user on back end to explain how to add data
    • Required: If you want it to be required.
    • Sub Fields: These are the items that you want to be repeated. Press “+ Add Field”.
      • I will not be going over all of the options today. Just make sure you add a Field Label and Field Name so we can access the data in the code.
      • For my example I will be adding an Image (Image), Title (Text), and Description (Text).
      • *Note: For the Image there is an option called Return Value. My code will be handling “Image Array”.
    • The rest of the VALUES can be changed as you feel fit! This is all we need for my code.
  • Make sure you press “Publish” on the top to complete the process


Steps for adding Data:

  • If you chose to display the form on Post or Pages navigate to the correct Post or Page you wish for the data to be entered
  • Click “Add Row” and enter in the data.
  • Keep pressing “Add Row” until all the data is entered.
  • You can delete a row on the left hand column.
  • Or reorder the row by dragging the numbers on the left hand column

PHP Code

This part of the process it going to be more difficult. This will required previous knowledge on the PHP side of WordPress. I will no go over the process of finding the correct location to add the code but these are my recommendations. Either create a Page-current page if that is were the ACF is. Or Add a template part for the posts.

COPY AND PASTE THIS IN THE CORRECT POSITION:


Responsive image

CSS Media Queries Min vs Max

Max-Width: If device width is less than or equal to 800px, then do {…}
** Use sparingly **

Min-Width : If device width is greater than or equal to 800px, then do {…}
 ** Use as much as possible as Max will load more styles **


<style type="text/css">
    /* default styles here for older browsers. 
       I tend to go for a 600px - 960px width max but using percentages
    */
    @media only screen and (min-width:960px){
        /* styles for browsers larger than 960px; */
    }
    @media only screen and (min-width:1440px){
        /* styles for browsers larger than 1440px; */
    }
    @media only screen and (min-width:2000px){
        /* for sumo sized (mac) screens */
    }
    @media only screen and (max-device-width:480px){
       /* styles for mobile browsers smaller than 480px; (iPhone) */
    }
    @media only screen and (device-width:768px){
       /* default iPad screens */
    }
    /* different techniques for iPad screening */
    @media only screen and (min-device-width: 481px) and (max-device-width: 1024px) and (orientation:portrait) {
      /* For portrait layouts only */
    }

    @media only screen and (min-device-width: 481px) and (max-device-width: 1024px) and (orientation:landscape) {
      /* For landscape layouts only */
    }
</style>

Credit :

  • http://kevinwtharp.com/lessons/Dynamic_Web_Technologies/Implementing_a_Responsive_Design_using_CSS_Media_Queries.html
  • https://stackoverflow.com/questions/13550541/media-min-width-max-width

Improving Website Page Speed Performance

Page Speed on a website can help especially for mobile users visiting your website. We recommend testing a website across different tools and not just relying on one.  Some of the tools we use for testing Page Speed performance are WebPageTest.org, Pingdom Website Speed Test, and Google PageSpeed Insights.

Image Optimazation

This is often overlooked but it’s probably the most important aspect of optimizing your website. Some methods/tools of image optimization you can use are

  • Photoshop – You can export images and save them at Quality 70
  • TinyPng.com – Allows you to upload both .jpg, .png files 20 at a time and optimizes them for you.
  • Grunt – Running a task to optimize your images while developing. We use grunt-contrib-imagemin.

Minify/Concat JS/CSS files

If you have multiple js/css resources on your site concatinating and minifying these files into 1 single file will help improve Page Speed performance. A Grunt Task can also help with this task. grunt-contrib-cssmin and grunt-contrib-uglify. Below is an example of what a Gruntfile.js may look like when using grunt-contrib-cssmin and grunt-contrib-uglify.

uglify: {
  options: {
    mangle: false,
    sourceMap: true
  },
  my_target: {
    files: {
      'assets/js/scripts.min.js': [
        'src/js/google-fonts.js',
        'src/js/jquery.nivo.slider.js',
        'src/js/jquery.prettyPhoto.js',
        'src/js/main.js'
      ]
    }
  }
},
cssmin: {
  options: {
    sourceMap: true
  },
  target: {
    files: {
      'assets/css/styles.min.css': [
        'src/css/bootstrap.css',
        'src/css/reset.css',
        'src/css/nivo-slider.css',
        'src/css/prettyPhoto.css',
        'src/css/styles.css'
      ]
    }
  }
}

Classic ASP Function to Set Dynamic Image (1 of 2)

I reviewed some recent client Classic ASP code and found a 4 level deep branching of an IF statement. Reading the code, its intent is to look at the object type and return an icon representing the type.


   <% 
    if  obj.type = "car" then
            response.write("<img src="/images/icons/car.png" />")
    ElseIf obj.type = "boat" then
	    response.write("<img src="/images/icons/boat.png" />")
    ElseIf obj.type = "bike" then
	    response.write("<img src="/images/icons/bike.png" />")
    Else
	    response.write("<img src="/images/icons/placeholder.png" />")
   %>


I try to stay away from IF statements altogether but using a SINGLE if statement is something I do use. However, once the IF statement gets past 2 branches, I consider this a CODE SMELL it requires refactoring.

I am going to break my thoughts into small code refactorings so you can understand each step. each step in itself is an improvement to the code, but combined, it will help make changes for the client easier and less prone to bugs.

Step 1

Taking a look at the above code, I notice we are repeating the IMAGE SRC path. So let’s see if we can make better.


   <% 
    Dim imgSrc
    imgSrc = "/images/icons/"

    if  obj.type = "car" then
            response.write("<img src='" & imgSrc & "car.png" />")
    ElseIf obj.type = "boat" then
	    response.write("<img src='" & imgSrc & "boat.png" />")
    ElseIf obj.type = "bike" then
	    response.write("<img src='" & imgSrc & "bike.png" />")
    Else
	    response.write("<img src='" & imgSrc & "placeholder.png" />")
   %>


Step 2

Now, we are still repeating the response.write(" block several times. Let’s refactor the IF statement to only have logic about the obj.type.


   <% 
     Dim imgSrc, img
     imgSrc = "/images/icons/"

     img = "placeholder.png"
     if  obj.type = "car" then img = "car.png"
     if  obj.type = "boat" then img = "boat.png"
     if  obj.type = "bike" then img = "bike.png"

     response.write("<img src='" & imgSrc & img & "'" />")


   %>


Refactoring Results

The code is much easier to read and to maintain. We can easily add more branches without thinking of the rest of the logic. A non-programmer can look at this code and figure out how to add more images or even change the root path to the images.

In the next post, we will extract the IF statements into a Classic ASP Function.


If you are a looking for Classic ASP Experts or upgrading to .NET from Classic ASP , give us a call.


Adding Custom Properties to Objects in Classic ASP

I the last blog post Converting Recordset into Objects in Classic ASP we created a public function initialize(rs) which takes in a single row from the database and creates a single class object account.  Our goal is to add a new property named fullname where we combine firstname and lastname

We will update the public function initialize(rs) as follows:


public function initialize(rs)

dim row
set row = New account

   row.id = rs("id")
   row.guid = rs("guid")
   row.lastName = rs("lastName")
   row.firstName = rs("firstName")
   row.fullname = rs("firstName") & ", " & rs("firstName") 
   row.email = rs("email")
   row.password = rs("password")
   row.passwordSalt = rs("passwordSalt")
   row.clientId = rs("clientId")
   row.administrator = rs("administrator")
   row.lastLogin = rs("lastLogin")
   row.created = rs("created")
   row.modified = rs("modified")
   row.active = rs("active")

set initialize = row

end function

Updated the UL code with a new LI item for fullname.

<%
Dim rsAccount
set rsAccount = getall()
%>

<ul>

<%
  While (NOT rsAccount.EOF)

  Dim account
  call account = initialize(rsAccount)

 %>
 
   <li><%=account.id%></li>
   <li><%=account.guid%></li>
   <li><%=account.lastname%></li>
   <li><%=account.firstname%></li>
   <li><%=account.fullname%></li>
   <li><%=account.email%></li>
   <li><%=account.password%></li>
   <li><%=account.passwordSalt%></li>
   <li><%=account.clientId%></li>
   <li><%=account.administrator%></li>
   <li><%=account.lastLogin%></li>
   <li><%=account.created%></li>
   <li><%=account.modified%></li>
   <li><%=account.active%></li>
 
 <% 
  rsAccount.MoveNext()
  Wend
 %>

</ul>

If you run the code as is, you will get an error Variable is undefined: 'fullname'

All we need to do is make sure the account Class a property defined for fullname.

Class account

  public id
  public guid
  public lastName
  public firstName
  public fullname 
  public email
  public password
  public passwordSalt
  public clientId
  public administrator
  public lastLogin
  public created
  public modified
  public active

End Class

Now your code should run without an error. You now have an account object with a property fullname.

If you are a looking for Classic ASP Experts or upgrading to .NET from Classic ASP , give us a call.


Converting Recordset into Objects in Classic ASP

Now that you know how to create a Class and Objects in Classic ASP, we will look at Converting Recordset into Objects in Classic ASP.

Lets create a Class account which has several properties. I usually use the database table account and copy the model so the Class matches the database model

Class account

  public id
  public guid
  public lastName
  public firstName
  public email
  public password
  public passwordSalt
  public clientId
  public administrator
  public lastLogin
  public created
  public modified
  public active

End Class

Here I am creating a getall function to return all the rows in the account table in the database.

public function getall()

   dim sql
   sql = "select * from account"

   dim rs
   set rs = conn.execute(sql)
   set getall = rs

end function

When I started with Classic ASP, I would have written a simple While Loop

<%
Dim rsAccount
set rsAccount = getall()
%>

<ul>

<%
  While (NOT rsAccount.EOF)
 %>
 
   <li><%=rsAccount("id")%></li>
   <li><%=rsAccount("guid")%></li>
   <li><%=rsAccount("lastname")%></li>
   <li><%=rsAccount("firstname")%></li>
   <li><%=rsAccount("email")%></li>
   <li><%=rsAccount("password")%></li>
   <li><%=rsAccount("passwordSalt")%></li>
   <li><%=rsAccount("clientId")%></li>
   <li><%=rsAccount("administrator")%></li>
   <li><%=rsAccount("lastLogin")%></li>
   <li><%=rsAccount("created")%></li>
   <li><%=rsAccount("modified")%></li>
   <li><%=rsAccount("active")%></li>
 
 <% 
  rsAccount.MoveNext()
  Wend
 %>

</ul>

The above code would write to the screen a <UL> foreach account row and <LI> foreach field/record in the database.

Object-Oriented Programming Approach

An OOP [Object-Oriented Programming] approach would be to initialize each account record using the account Class.

Instead of getting each data element using Recordset rsAccount("lastName"), we will use another function to map the Recordset row into our account object.

The public function initialize(rs) takes in a single row from the database and creates a single class object account.


public function initialize(rs)

dim row
set row = New account

   row.id = rs("id")
   row.guid = rs("guid")
   row.lastname = rs("lastname")
   row.firstname = rs("firstname")
   row.email = rs("email")
   row.password = rs("password")
   row.passwordSalt = rs("passwordSalt")
   row.clientId = rs("clientId")
   row.administrator = rs("administrator")
   row.lastLogin = rs("lastLogin")
   row.created = rs("created")
   row.modified = rs("modified")
   row.active = rs("active")

set initialize = row

end function

Updated code combining Recordset with Class and Initializing each row into an object.

<%
Dim rsAccount
set rsAccount = getall()
%>

<ul>

<%
  While (NOT rsAccount.EOF)

  Dim account
  set account = initialize(rsAccount)

 %>
 
   <li><%=account.id%></li>
   <li><%=account.guid%></li>
   <li><%=account.lastname%></li>
   <li><%=account.firstname%></li>
   <li><%=account.email%></li>
   <li><%=account.password%></li>
   <li><%=account.passwordSalt%></li>
   <li><%=account.clientId%></li>
   <li><%=account.administrator%></li>
   <li><%=account.lastLogin%></li>
   <li><%=account.created%></li>
   <li><%=account.modified%></li>
   <li><%=account.active%></li>
 
 <% 
  rsAccount.MoveNext()
  Wend
 %>

</ul>

If you are a looking for Classic ASP Experts or upgrading to .NET from Classic ASP , give us a call.


How to create a Class and Objects in Classic ASP

Creating Objects in programming is one the best ways to have code that is easily maintainable. With new Classic ASP clients, I have found creating Classes and Objects is a very good way to begin refactoring legacy code.

Class trip

    public arrive_date
    public depart_date

End Class

Here we have created a Class trip with 2 properties arrive_date and depart_date. Now, when we need to access the arrival date, you can access the values as

myobject.arrive_date
myobject.depart_date

Before we can access or use the trip Class, we need to create a new instance of a class. The newly instantiated trip Class, which is now an object with the properties, that we can use.


Class trip

    public arrive_date
    public depart_date

End Class


dim objTrip
set objTrip = new trip

objTrip.arrive_date = '02/11/2017'
objTrip.depart_date = '02/16/2017'

Now that we have created a new instance of our trip and assigned values to each property, we can write some simple HTML to retrieve the values

<p>

I will be arriving on <%=objTrip .arrive_date%> and leaving on <%=objTrip .depart_date%>

<p>


If you are a looking for Classic ASP Experts or upgrading to .NET from Classic ASP , give us a call.


Isotope Sorting Ascending / Descending

We worked on a project where we had a media library. We decided to use Isotope to filter/sort through a list of all the media items available. We wanted to the user to be able to sort through the items in both Ascending / Descending order. Below is how we accomplished that.

By default, Isotope sorts ascendingly: A, B, C and 1, 2, 3. To sort descendingly Z, Y, X, and 9, 8, 7, set
sortAscending: false.

// sort highest number first
$grid.isotope({
  sortBy: 'number',
  sortAscending: false
});

We first added a data-attribute called data-sort-direction="asc" on a button element. When the button is clicked we get the data-sort-direction="asc" data-attribute value and convert that value to a boolean. We then use that boolean to set our new direction and store that in a variable called newDirection to use later.

 /* convert it to a boolean */
    var isAscending = (direction == 'asc');
    var newDirection = (isAscending) ? 'desc' : 'asc';

We then pass in our isAscending value into the sortAscending property.

/* pass it to isotope */
    $grid.isotope({ sortBy: sortValue, sortAscending: isAscending });

The last bit of code we use is to change the value data-sort-direction="asc" to the value of newDirection. This is so that next time the button is clicked it will sort the items in the opposite order.

$(this).attr('data-sort-direction', newDirection);

One Typeface – How to use fonts effectively

How many fonts should I use on my website?

Well, it depends. 
As a general rule, you should probably stick with 2 or 3 fonts for your website.

Design

Generally speaking, using 2 or 3 fonts will ensure that your site has a consistent look and feel. Establishing a visual hierarchy for your users will be easier with less fonts. 

Load Time

Like everything on your website, fonts must be loaded in order for a user to see them. Using too many fonts can actually slow down your website significantly. 

Is 2 or 3 fonts enough?

We happen to think so. In fact, we believe that most of the time you can design a website using just one font.

The trick is to use variations of font weight, spacing, and line height to establish a clear visual hierarchy. The best part? Since its technically all the same font, your site is almost guaranteed to have a consistent look and feel. This consistency is great for brand recondition. We suggest that you actually use this rule across platforms and mediums to further establish your brand.

Where can I find fonts?

We suggest checking out Google Fonts .

They have a large variety of  web fonts that load quickly and look great. You can also download the fonts you choose and use them for other mediums, such as print and presentations.

Oh, and did I mention that it’s free?

The One Font Challenge

Using Google Fonts, we have created a few examples of using one font. By using different font sizes, weights, spacing and line height, we think we were able to establish a solid look for each of the three examples. We used some free images from Unsplash to help establish the tone for each example. Remember, all of these fonts can be downloaded for free using Google Fonts.


Example : Merriweather


Example : Montserrat


Example : Open Sans