Search and Replace

Changing permalinks or any other string in a database can be a hassle especially if you don’t know MySql commands.  When working with WordPress you’ll soon run into this situation where you need to change a string across the entire database whether you’re changing permalinks when launching or migrating a site or just doing a find and replace on the entire database.

Luckily I came across this tool called Database Search and Replace Script in PHP

Installation & Use

To use the script, download the zip file from Database Search and Replace Script in PHP, extract the folder called search-replace-db-master, renaming it to something of your choosing, upload it to your web sites root directory, then navigate to that folder in your browser (domainname.com/your-secret-search-replace-folder). The script will automatically attempt to find and populate the database fields but make sure to double check that the information is correct.

The root WordPress structure would looks like this.

/your-secret-search-replace-folder
/wp-admin
/wp-content
/wp-includes


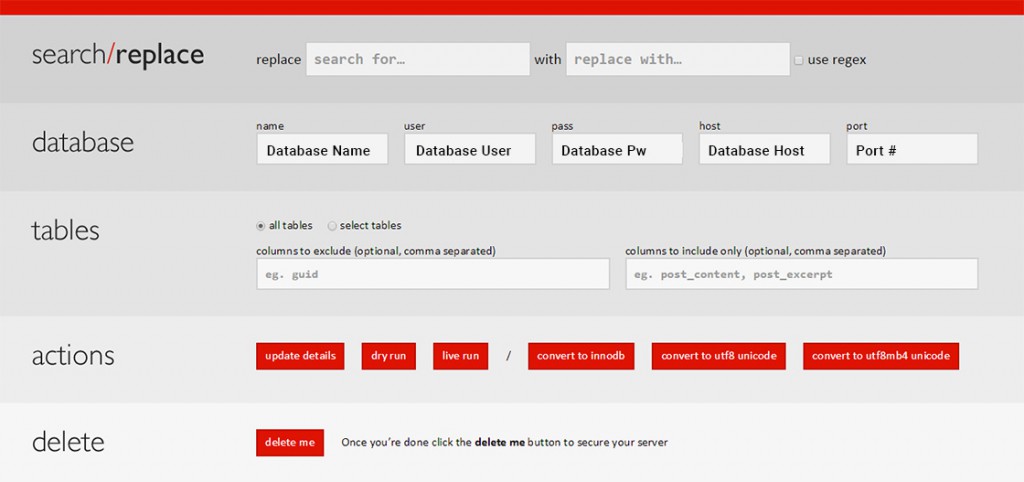
Navigating to the following url (domainname.com/your-secret-search-replace-folder) using your browser will bring up the following page.

search-replace-db-details

  1. Fill in the field you want search for then fill in the field you want to replace with
  2. Database: Make sure the database field information is correct.
  3. Tables: Select Which tables you want to include
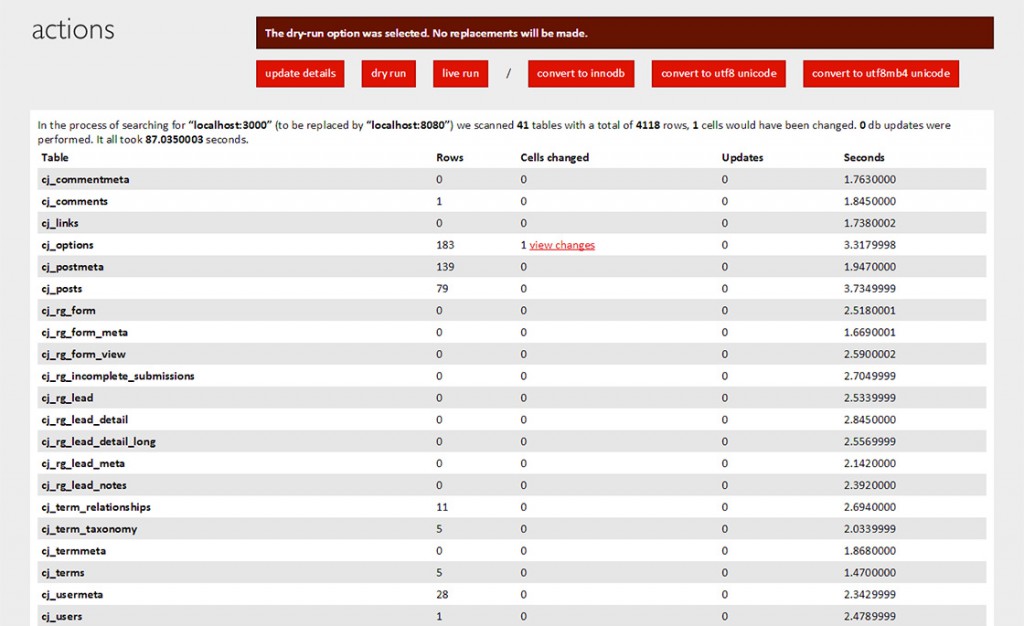
  4. Actions: Click dry run to run a scan first to see how many instances of your field will be replaced ( Will not change fields only runs a search )

After dry run is clicked it will go search through the database tables and look for the instance you defined in the search for field.

search-replace-db-tables


If you’re satisfied with the dry run then go ahead and click live run ( This will execute find/replace and change all the fields ).

*** Very Important *** After you’re done making your find/replace changes make sure to delete the folder ( /your-secret-search-replace-folder ) from your root directory.

WordPress Themes Required Plugins

This tutorial will show you how you can alert the users installing the theme that the plugin requires certain plugins to be installed.

When developing a theme you often times rely on certain plugins to add additional functionality to your theme. In this case the following theme relied on 2 Plugins. Testimonials by WooThemes, and Features by WooThemes


The following code was taken from http://www.paulund.co.uk/theme-users-required-plugins. We use it on our themes and I will explain what it does.

  1. First we’re going to hook into the admin_notices hook in wordrpess and run a function called showAdminMessages.
  2. We create our function showAdminMessages and create an empty array $plugin_messages.
  3. Since we’re going to be using the function is_plugin_active we have to require the following file
    include_once( ABSPATH . 'wp-admin/includes/plugin.php' );
  4. We then use an if statement to check if the plugin is not active !is_plugin_active to check the plugins main file.
  5. If the plugin is not active we add a message to our $plugin_messages array notifying the user that the plugin is required and a link to downlod.
  6. We then use another if statement to count our $plugin_messages array > 0 and use foreach to loop through each message and echo out a <div id="message" class="error">
  7. You can see the full code in action below.

The Dhali Team illustration

This week I was able to work on a few fun projects regarding our team here at Dhali. Part of this was creating avatar images for us in the office. I wanted to create an accurate representation of everyone in the most minimalistic style possible. When I finished I threw them all together.

This evolved into a “team portrait”.

team


My process for these is to take a photo of the team member and throw it into illustrator. Then I select the layer and set it to template mode, which makes it easier for me to distingish the layers. From here, I try and trace out all of the major features using the pen tool. liia-rough

From here, I get rid of the back ground image and make a few decisions on style and color.

liia-two-02

The last thing I do is tighten up the design and add a background. The final avatar can be seen below.

liia