Outlook Email Setup

These instructions will walk you through email setup on an Outlook 2010.

Earlier versions of outlook are very similar.


Step 1: Open Outlook 2010 > To setup a new email account just click on File > Info > Add Account

outlook-1


Step 2:  Select Manually configure server settings or additional server types option > Click Next

outlook 2010 x3


Step 3: Select Internet Email > Click Next

outlook-3


Step 4: Enter Email Settings

User Information
Name: Your Name
Email Address: Your Full Email Address

Server Information
Account Type: 
POP3
Incoming Mail Server: mail.domainname.com
Outgoing Mail Server (SMTP): mail.domainname.com

Logon Information
User Name: 
Your Full Email Address
Password: Enter the password for this Email address

outlook-4


Step 5: Click More Settings > Outgoing Server > Check My Outgoing Server (SMTP) requires authentication > Use same settings as my incoming mail server

outlook-5


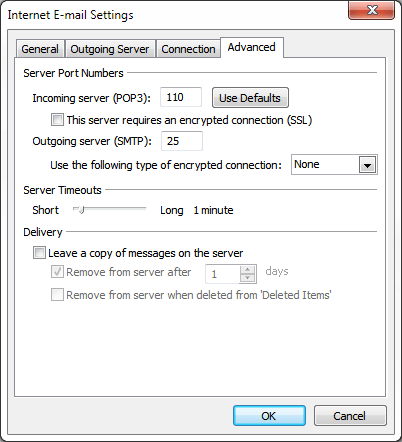
Step 6: Click Advanced Tab

Incoming Server (POP3): 110
Outgoing Server (SMTP): 25 (If your ISP blocks this port change to 8080)

Leave a copy of messages on the server should be unchecked.

Leaving copies of messages in the server will fill up and exceed the limit for the account, resulting in errors and preventing you from sending and receiving emails.

Only check this option if this email account needs to be setup on a second device (phone, another pc) if so follow Step 7 below otherwise Skip Step 7.

outlook-6


Step 7: If email account needs to be setup on multiple devices.

Leave a copy of messages on the server should be checked.
Remove from server after should be checked as well and set to 1 days

outlook-6a


Step 8: Click OK > Next > Finish

At this point you your email account should be all set.

iPhone Email Setup

These instructions will walk you through email setup on an Apple iPhone.


Step 1: Go to “Settings” from the home screen of your iPhone.

iphone-step-1


Step 2: Go to “Mail, Contacts, Calendars”.

iphone-step-2


Step 3: Under accounts, select “Add Account”.

iphone-step-3


Step 4: Select “Other“.

iphone-step-4


Step 5: Select “Add Mail Account”.

iphone-step-5


Step 6:

iphone-step-6

In the New Account menu, you will need to specify the following fields:

Name: your name, it will appear as a sender name.
Address: your full email address.
Password: password for this email address
Description: you can specify any description.

Select “Next”


Step 7:

iphone-step-7

After Selecting “Next” you will need to enter in our mail server information.

Select POP

Incoming Mail Server
Host Name: Example “mail.yourdomainname.com”
User name: your full email address.
Password: If the password field is not filled in, re-enter it the password for this email address

Outgoing Mail Server
Host Name: Example “mail.yourdomainname.com”
User name: your full email address.
Password: enter the password for this email address

Select “Save”


Step 8:

It will Attempt to Verify. You will get a Message “Cannot Verify Server Identity” Click “Continue” (This may take a couple minutes).

When the verifying is finished you will be redirected to Mail, Contacts, Calendars screen. Please Select the account you just created. Scroll down the screen and select “Advanced“.

iphone-step-8

Incoming Settings
SSL: Set to off
Authentication: Password
Server Port: 110

Once the above settings are changed go back to the previous screen.


Step 9:

Select “SMTP”

iphone-step-9

Select “mail.yourdomainname.com”
Server: Set to On
SSL: Set to Off
Authentication: Password
Server Port: 25 (if your network provider blocks this port change Server Port: 8080)

Select “Done”


Step 10:

At this point you your email account should be all set. Make sure the settings are saved and then Select the mail icon from the home screen of your iPhone to begin retrieving your email.